Your browser searches IP address of every visited site, but more often local Internet supplier doesn’t give the fastest DNS server. Another way to correct it is switching to OpenDSN or Google DNS.
In this article we will look how to do it in Windows 7, 8 or 10.
Switching to a Better DNS Provider
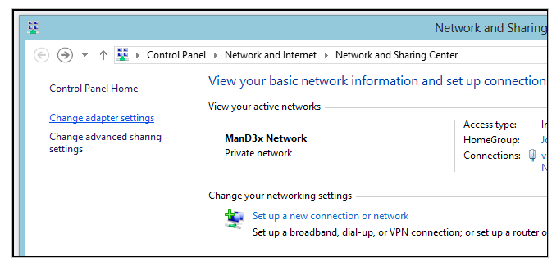
First, go to your network status notification icon and right-click on it. Select from the menu Open the Network and Sharing Center.
Next, choose the Change adapter settings hyperlink on the left-hand side of the Network and Sharing Center.
Note: Another way to do this step faster is to write “ncpa.cpl” in the Start Menu’s search or Run box.
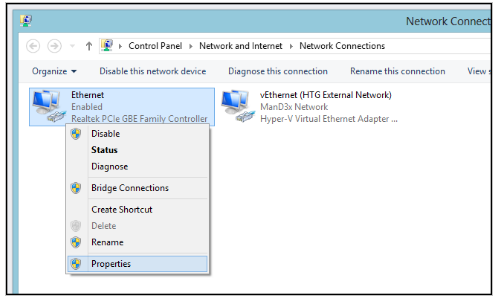
Next, right-click on the network adapter which you desire to change the DNS settings for. The next step is to select properties from the context menu.
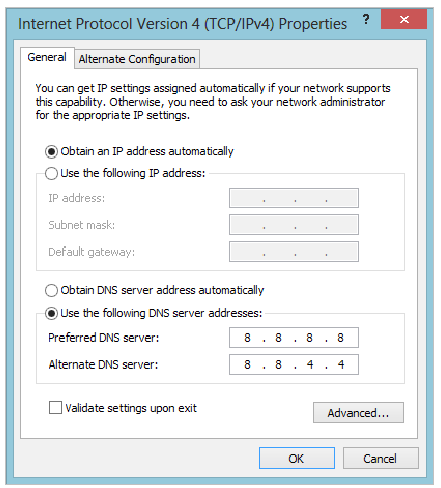
When the properties are opened, you should select Internet Protocol Version 4 (TCP/IPv4) from the list, and click Properties again.
In this example you will see the IPv4 settings for your network adapter. It’s seen on the bottom half of the dialog that your PC is set to get its DNS settings “automatically”. If you want, you can change it to manual settings.
Finally, select a service below and type the DNS server addresses.
Google DNS
Preferred: 8.8.8.8
Alternate: 8.8.4.4
OpenDNS
Preferred: 208.67.222.222
Alternate: 208.67.220.220
Here, we choose to go with Google DNS, but other people can use this information to track your browsing habits.
If you need more information how DNS works, please search articles in details about it.