Introduction
OpenCart is one strong and reliable platform for e-comercing. Its open-source code offers a good range of flexibility. We’ll put you through few easy steps in order to install OpenCart3 using the “Softaculous Auto-Installer”. After completing the tutorial you will have set up your own online shop.
Getting Started
The first thing you will need to do is to log in to you DirectAdmin account. Beneath the Home Page of the Client Area with CooliceHost.
When you are done with logging in to your account, we will need you to make your way to the “Software” directory. This section should contain the “Softaculous Apps Installer” icon.

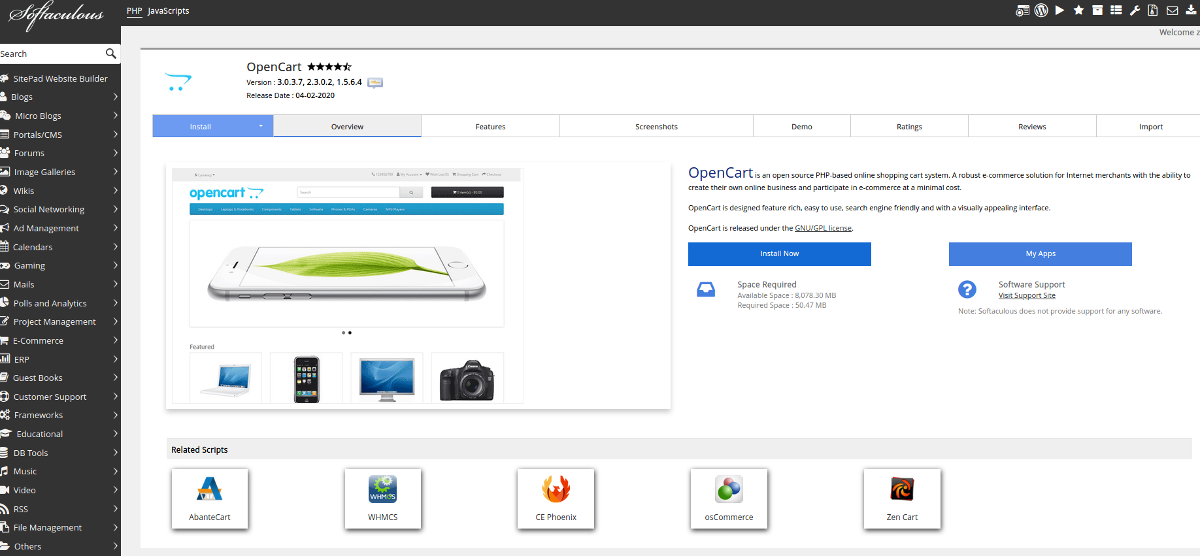
Once you are able to enter the Softaculous dashboard, you should locate the search bar on the left side of the page. Please, type “OpenCart” which will result in the app showing below.

After clicking on the application’s name you should be led to the OpenCart preview page. From there you will begin installing the app.
Installation
On the overview page are displayed pictures of the app itself and descriptions. A bit right from the photos you should be able to locate a button called “Install Now” which you will need to click.

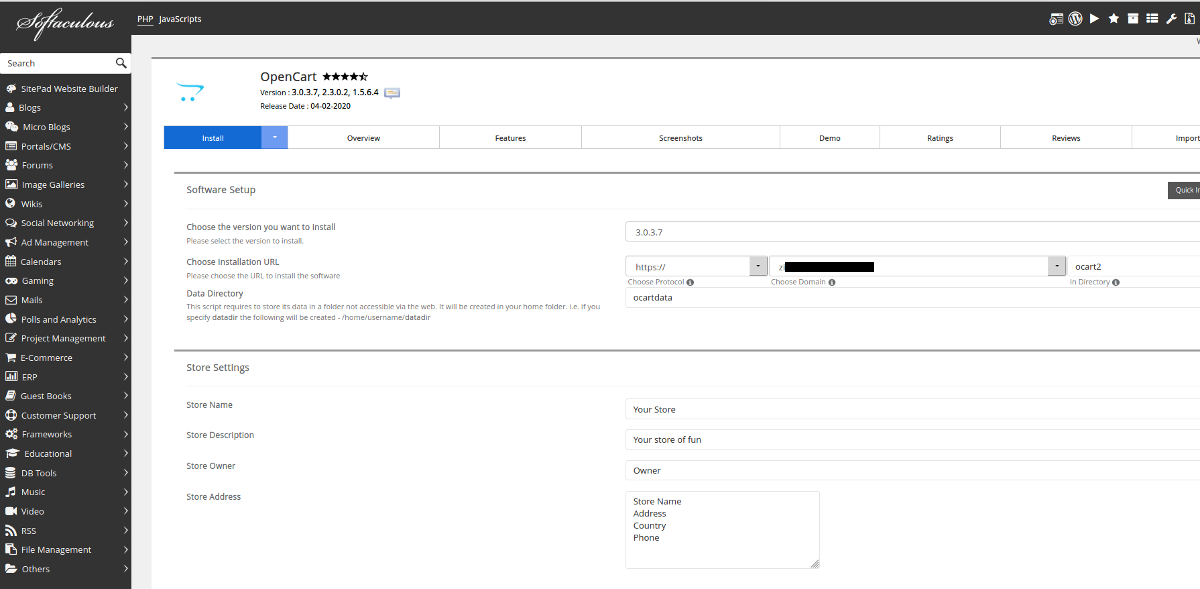
On the screen that will show up, you will be asked to set up a particular configuration of details which are compulsory for the installation. We will go with you through every single one of the sections in order to help you start your online store. Let’s start with completing the “Software Setup”.

Firstly, you are asked to choose the version you are installing. Apparently, the versions supported by Softaculous are OpenCart 1.5, 2, and 3. Our team suggests selecting the latest possible one unless another one is inevitably required.
The next step is to set up the URL settings of your website:
- “Choose Protocol” – When you click on the arrow a drop list should appear. From it you ought to select the protocol required for the installation. Take into account that for the HTTPS protocol to run as expected you must have a domain name with installed an up to date and valid SSL certificate;
- “Choose Domain” – As the previous step, there should be a dropdown menu. This time you are picking a domain onto which the installation will be executed;
- “In Directory” – In this bar, you are given the ability to choose the directory in which you want the installation to be done. If your preference is to perform the installation directly beneath the domain name’s main folder (for example https://mydomain123.com), you are expected to leave the particular field empty.
On the other hand, if you want the installation of the application to be performed below a subdirectory (for example https://mydomain123.com/yourstore), make sure to write the name of the subdirectory under these bars and check if it is spelled correctly.
In the field of “Data Directory” you are expected to determine the directory in which OpenCart data will be saved. Please take into account the fact that the app needs to store its data in a folder which apparently does not have public access. What that means basically is that a new folder will appear in your home directory.
Next on the list is the “Store Settings” part. Here you have the freedom to enter your store’s details which you can edit any time after the installation. Please, note that this does not influence the installation process in any particular way.
- “Store Name” – In this field you are expected to type the name of your shop which will be written on the browser’s title bar;
- “Store Description” – Here you are able to write a short description of your new online store;
- “Store Owner” – In this bar you are able to determine the name of the person who owns the shop;
- “Store Address” – In this field you should enter the physical address on which your store is located.
The next two sections are “Admin Account” and “Choose Language”. In them you are asked to determine the admin login data and choose the language in which he or she is going to work.

In order to avoid exposing your website to different attacks you ought to change the default username and make sure you use a really strong password which you won’t forget. If you aren’t able to come up with such password you can always utilize the “Key” icon which is a password creator. It has an algorithm that will generate a reliable password. Our advice is, if you decide to use the generator, to write the password on a piece of paper. After you finish with the password you need to select an email for the admin account which will be utilized for pretty much everything, for example password reset requests, update notifications, etc.
The last thing from that step that you will need to do is choosing the language for your admin. When you go to the “Select Admin Language” and click the arrow on the field a dropdown menu should appear. From it, please, pick the most suitable language.
The last section is actually not necessary. It is the “Advanced Option” one. It will give you the ability to make customizations to the data of your OpenCart shop.
You are given the chance to give a customized name to your database “Database Name” and make changes in the database “Table Prefix”. You are able to turn off the email notifications by simply ticking the box next to “Disable Update Notifications Emails”. You are given control over the “Backup location”, the Softaculous “Automated Backups” and the “Backup Rotation”. A thing to take into account is that they will be saved under your host account and will require some of your free storage space. If you are using one of the CooliceHost’s hosting offers, your data is already backed up on a separate remote server in order to keep it safer.
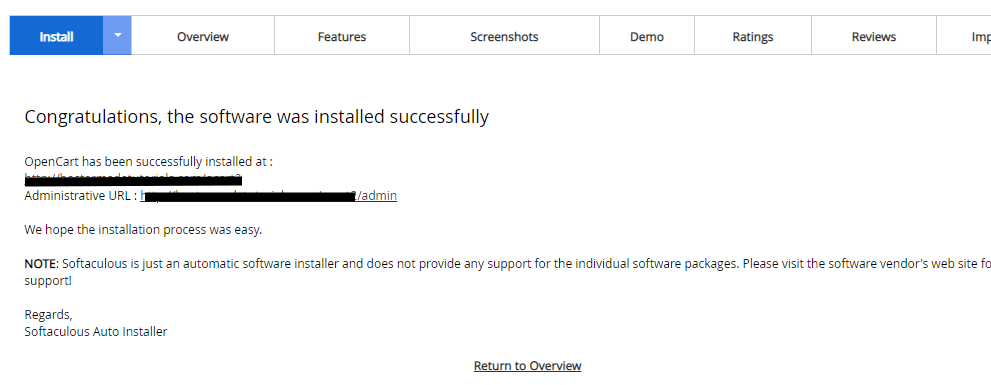
When you have entered everything required for the installation, please click the blue “Install” button to begin installing the application. You should keep in mind that the process might take some time. Once it’s finished, you will be given your shop URL address and the URL address of your admin dashboard.

Now, we will ask you to have a look around in order to make sure everything functions without any bugs or lags. When you check that everything works as it is supposed to, you are good to go!
Great job! By finishing this tutorial you have made the first step towards having a successful Online Shop. The next step you want to take in that direction is, well, putting your creativity into use. Utilize it in the further development of your store and make it one of the most visited ones. If you are experiencing any difficulties feel free to contact our Support Team. We wish you good luck!