Wenn Sie planen, Ihre Website von Ihrem derzeitigen Hosting-Anbieter auf einen der Webhosting-Server von CooliceHost zu übertragen, sollten Sie zunächst einen Test durchführen, bevor Sie die DNS-Einträge ändern oder, mit anderen Worten, die Domain umleiten. Hier finden Sie Informationen darüber, wie Sie Ihre Website zu uns migrieren und testen können, ohne Änderungen an den DNS-Einträgen der Domain vorzunehmen. Das Einzige, was Sie wissen müssen, ist die IP-Adresse Ihres neuen Servers (diese Information finden Sie in der Bestellbestätigungs-E-Mail, die wir Ihnen zusenden, sobald Sie das gewünschte Hosting-Paket bestellt haben).
Wie Sie wissen, bezieht sich die Hosts-Datei auf verschiedene Systemfunktionen, die bei der Adressierung von Netzwerkknoten in einem Computernetzwerk helfen. Sie ist ein wesentlicher Bestandteil der Internetprotokoll (IP)-Implementierung jedes Betriebssystems. Sie hilft bei der Übersetzung numerischer Protokolladressen sowie bei der Identifizierung und Lokalisierung eines Hosts in einem IP-Netzwerk. In der Standard-Hosts-Datei ist bereits ein Eintrag für Ihren Localhost mit der IP-Adresse 127.0.0.1 vorhanden.
Bearbeiten der Hosts-Datei unter Linux
Linux-Distributionen – oder zumindest die meisten davon – verwenden die Hosts-Datei unter /etc/hosts. Sie benötigen Root-/Sudo-Zugriff, um diese Datei zu bearbeiten, andernfalls können Sie hier nichts tun. Öffne die Datei mit einem Editor oder rufe sie über dein Terminal auf (Befehl: sudo nano /etc/hosts). Normalerweise sieht sie in etwa so aus:
127.0.0.1 localhost
::1 localhost ip6-localhost ip6-loopback
Sie können Ihre Domain zu Testzwecken in die Hosts-Datei eintragen. Dabei müssen Sie angeben, welche Domain auf welche IP-Adresse verweist (die angegebene IP-Adresse 196.178.0.2 dient nur als Beispiel; Sie müssen die IP-Adresse Ihres neuen Servers verwenden, auf dem Ihre Website gehostet wird). Fügen Sie folgende Zeile hinzu:
196.178.0.2 www.domain.com domain.com
Nach der Bearbeitung sieht die Hosts-Datei wie folgt aus:
127.0.0.1 localhost
::1 localhost ip6-localhost ip6-loopback
196.178.0.2 www.domain.com domain.com
Oder....
127.0.0.1 localhost
::1 localhost ip6-localhost ip6-loopback
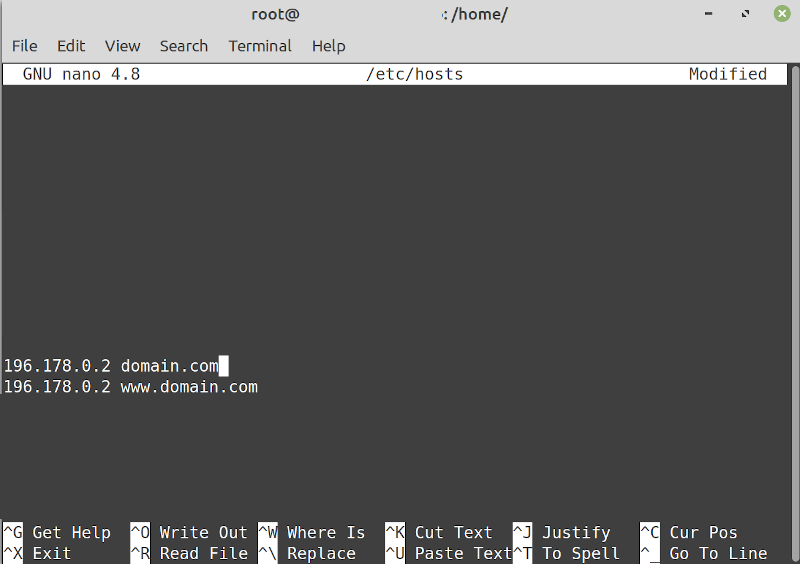
196.178.0.2 domain.com
196.178.0.2 www.domain.com
Es sollte so aussehen:
Speichern Sie die Datei. Geben Sie im Terminal Strg + X ein und drücken Sie anschließend Y für „Ja“. Alle Anfragen für die Domains www.domain.com und domain.com werden an die angegebene IP-Adresse (196.178.0.2) weitergeleitet.
Bearbeiten der Hosts-Datei unter Windows
Unter Windows 7 und höheren Versionen befindet sich die Hosts-Datei hier %SystemRoot%\system32\drivers\etc\hosts, wobei %SystemRoot% das Verzeichnis ist, in dem Windows installiert wurde. Es sollte lauten: C:\Windows\System32\drivers\etc\hosts. Sie können die Datei mit dem Notizblock bearbeiten; dazu benötigen Sie Administratorrechte. Befolgen Sie diese Schritte:
1. Klicken Sie unten links auf das Startmenü.
2. Wählen Sie Alle Programme.
3. Gehen Sie zu Zubehör.
4. Klicken Sie mit der rechten Maustaste auf Notepad und wählen Sie „Als Administrator ausführen“.
5. Navigieren Sie zum folgenden Pfad: %SystemRoot%\system32\drivers\etc\ (Standard: C:\Windows\System32\drivers\etc\).
6. Sie müssen festlegen, dass statt „Textdokumente (*.txt)“ alle Dateien im Verzeichnis angezeigt werden.
7. Öffnen Sie die Hosts-Datei.
Fügen Sie nun neue Einträge hinter den Kommentarzeilen hinzu, die mit # beginnen. Nach der Bearbeitung sollte die Datei wie folgt aussehen:
.
.
.
# Die Namensauflösung für „localhost“ erfolgt innerhalb des DNS selbst.
# 127.0.0.1 localhost
# ::1 localhost
196.178.0.2 www.domain.com domain.com
Bearbeiten der Hosts-Datei unter Mac OS X
Die Hosts-Datei in Mac OS X befindet sich unter /etc/private/hosts. Die richtige Vorgehensweise zum Bearbeiten ist die Verwendung des Terminals. Dazu geben Sie entweder „Terminal“ in Spotlight ein oder öffnen den Finder und navigieren zu Programme > Dienstprogramme > Terminal. Um die Hosts-Datei zur Bearbeitung zu öffnen, geben Sie Folgendes ein:
sudo nano /etc/private/hosts
Die Datei sieht genauso aus wie unter Linux oder jedem anderen *nix-System. Sie können die neue IP-Adresse für die Domain hinzufügen:
127.0.0.1 localhost
::1 localhost ip6-localhost ip6-loopback
196.178.0.2 www.domain.com domain.com
Oder....
127.0.0.1 localhost
::1 localhost ip6-localhost ip6-loopback
196.178.0.2 domain.com
196.178.0.2 www.domain.com
Die Hosts-Datei testen
Wenn Sie sich nicht sicher sind, ob alles, was Sie vorgenommen haben, ordnungsgemäß funktioniert, können Sie dies testen, indem Sie die Domain in Ihrem Terminal anpingen. Auf diese Weise können Sie überprüfen, ob die Domain auf die richtige IP-Adresse verweist, die Sie in Ihrer Hosts-Datei hinzugefügt haben. Geben Sie dazu Folgendes ein:
ping www.domain.com
Die Antwort sieht in den meisten Fällen so aus (von der neu konfigurierten IP):
PING www.domain.com (196.178.0.2) 56(84) Bytes an Daten.
64 Bytes von www.domain.com (196.178.0.2): icmp_req=1 ttl=58 Zeit=1,30 ms
64 Bytes von www.domain.com (196.178.0.2): icmp_req=2 ttl=58 Zeit=1,41 ms
64 Bytes von www.domain.com (196.178.0.2): icmp_req=3 ttl=58 Zeit=1,36 ms
64 Bytes von www.domain.com (196.178.0.2): icmp_req=4 ttl=58 Zeit=1,66 ms
Wenn Sie Linux oder Mac OS X verwenden, können Sie den Befehl „ping“ über die Shell bzw. das Terminal ausführen. Unter Windows müssen Sie die Befehlszeile öffnen: Drücken Sie dazu die Tastenkombination STRG + Windows-Taste auf der Tastatur. Geben Sie im sich öffnenden Fenster „cmd“ ein und drücken Sie die Eingabetaste.